Herbs have become an essential part of modern day living and because of their long shelf life, dried herbs are becoming even more popular than their fresh counterparts, which often wilt within days or even hours of purchasing them.
The idea of drying herbs at home is certainly not a new phenomenon as we have been doing it for hundreds if not thousands of years.
Since this time, we’ve used dried herbs and spices in cooking, to give our food flavor and aroma, as well as in medicine to treat ailments such as cuts, bruises, colds and flu.
These days however, they are most commonly used for cooking and this is one of the reasons why store bough herbs and spices have, unfortunately, become so popular.
In addition to all this, what you may not have yet thought about is the fact that dried herbs and spices are actually preserved and are therefore a form of preserved food in the same way a can of fruit or vegetables is.
The herb drying process produces a much longer shelf life and dried herbs and spices can often last months, if not years, when stored correctly, although they can lose some of their pungency over time.
The Benefits of Drying Herbs and Spices at Home
1 – Cost
Take a look in your spice cabinet right now. You probably have no less than 10 different spices and herb bottles right now. Each of those bottles, depending on brand name, probably cost you a couple of dollars each.
Imagine how much money you could save by not purchasing the spices needed to make your meals delicious. You would have the luxury of adding as much as you wanted without worrying about how much it is costing you.
2 – Satisfaction
There is supreme satisfaction in growing, harvesting and then using food you have grown yourself. It gives you bragging rights.
When somebody complements a dish you have made, you can proudly tell them the secret is the herbs in which you grew yourself.
Tending a garden, even if it is a small one with just a few containers is somewhat therapeutic. A few minutes a day with your herbs will make you feel better.
3 – Aroma
Drying herbs give of a pleasant aroma that trumps any commercially produced air freshener. Your home will smell delightful.
Drying oregano, basil and even peppermint smell absolutely wonderful. You will feel as if you are walking into your favourite restaurant every day.
The aromas eliminate many of the smells we often pay to mask. You won’t have to worry about spraying an aerosol spray in the room before guests arrive or burning candles in the hopes you can cover an unpleasant odour.
4 – Quality Control
When you pluck your herbs from your own plants, you know exactly where they have been and what has been applied to the plant and soil. You can pick the best leaves and stems and discard the ones you don’t like.
You have complete control over the quality of the herbs you dry, store and serve your family. You don’t have to worry about the herbs being contaminated or getting a bad batch.
Organic is very important to many people. Herbs are very easy to grow and really they don’t need any fertilizers.
They are natural pest repellents and don’t need to be treated with any chemicals. Growing your own organic herbs ensures you have complete control over what is being put into your food.
5 – Convenience
Stopping a recipe right in the middle to run to the store to grab a particular ingredient is irritating and could potentially ruin the dish.
Having a one-stop shopping centre on your patio or windowsill makes it easy for you to keep a steady supply of the herbs and spices you use to cook with.
You won’t have to worry about running out and being forced to run to the store or doing without a particular flavour in a recipe. Having a supply of fresh and dried herbs is a convenience that will make you wonder how you ever managed without it.
Drying Herbs – How to Harvest Herbs and Spices Correctly
Believe it or not, harvesting herbs at home can be a very simple process and it often takes less than 10 minutes.
However, despite this, there are a few simple guidelines you can follow in order to produce a successful batch of preservative-free, completely homemade dried herbs and spices.
For instance, in order to produce a flavourful batch of dried herbs or seed spices, you’ll need to harvest them at the correct time of day.
In addition to this, you’ll also need to use the correct tools in order to harvest the best part of the plant. Don’t let this deter you as you’ll find a few simple guidelines below.
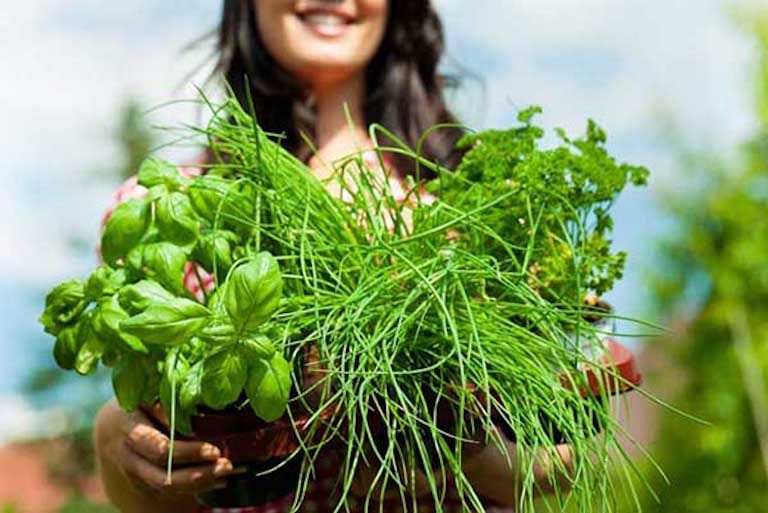
1 – How to Choose Herbs and Spices for Harvest
In order to harvest your chosen herbs and spices you’ll either need to start off with some readily available herbs, either from your garden or from a store. You can purchase either a herb plant or seed spices from a store, but try to ensure they are organic where possible as this will ensure your resulting dried herbs and spices are free from pesticides and any other nasty chemicals.
It can be difficult trying to choose what to harvest first as there are simply so many different herbs and spices to choose from. For this reason, it is best to choose herbs and spices that you use often as you’ll likely get the most benefit from them this way.
You may also want to choose them depending on the drying method you would prefer to use, which means that you’ll have to take into account the moisture content of the herbs and the suitability of spices in terms of drying methods. If this is the case then take a look at the above section for more information on drying methods as well as a guide to the moisture content of different herbs.
If you’re still unsure of which herbs and spices to choose then take a look at the list below, which contains many popular herbs and spices that are suitable if you’re a complete beginner and are looking at drying herbs at home.
Beginner Herb and Spice Ideas
- Basil
- Mint
- Tarragon
- Black pepper (peppercorn plant)
- Coriander
- Cumin
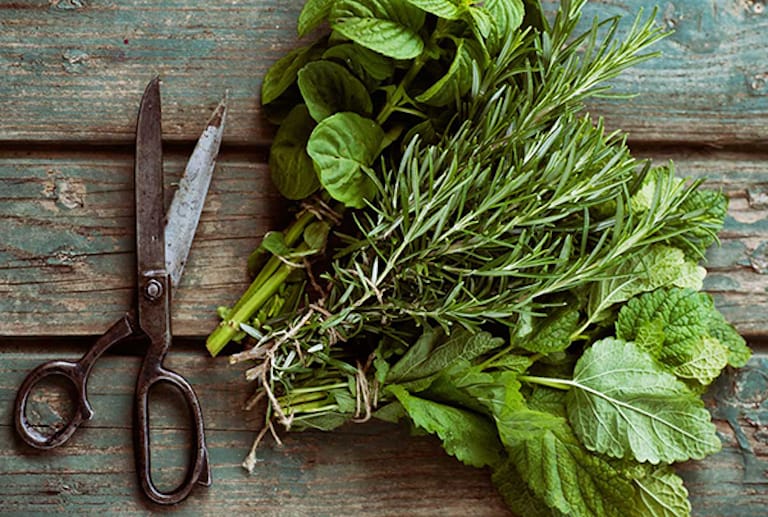
2 – How to Cut Herbs and Spices Properly
Once you’ve chosen your herbs and spices you’ll then want to think about how you are going to harvest them.
This actually sounds a lot scarier than it is and in reality, it only involves a pair of sharp garden shears or scissors and a little knowledge of how and where to cut your herbs!
Below you’ll find step-by-step instructions on how to harvest herbs for the first time.
Step 1
The First thing you’ll want to do before cutting your herbs and spices is to ensure that you have a very sharp pair of garden shears or kitchen scissors to hand.
- Be sure to check that your chosen herb plant has not flowered yet as ideally, you need to catch it before it has flowered (whilst the buds are still apparent) as this will produce the best results. The same is true when you harvest spices. The seed heads should be a rich, dark brown and almost hard but not yet ready to open up or shatter.
Step 2
Secondly, you’ll need to be ready to harvest your herbs or seed spices such as pepper and coriander early in the morning.
This is because it is always best to harvest herbs early, after the morning dew has disappeared but ideally before the weather becomes too warm. It is at this point when the plants oils are most pungent and this will produce a very flavourful batch of herbs.
Step 3
Next, you’ll need to take some cuttings (or seeds) from your herb plant although do bear in mind that how much you cut will depend on exactly which herb you’re taking a cutting from.
- If you’re cutting a perennial plant, take no more than one third of the growth in order to allow the plant to re-grow. If you’re cutting an annual plant, you can harvest up to half of the growth.
Step 4
Taking into account the guidelines above, remove as much growth as necessary from your chosen herb plant.
Be sure to cut around 1/3 of the stems length. Then gather your cuttings together and take them into the kitchen to prepare for the drying process.
Step 5
In order to prepare herbs for the drying process, you may want to rinse your cuttings very gently under a little cold running water.
This step can be skipped if you know they are free from debris as water can damage your cuttings and reduce their flavour. If you do decide to rinse your cuttings under running water, be sure to pat them dry using a paper towel afterwards.
Step 6
Next, you’ll want to strip your herbs of their leaves either by using your fingers or a pair of sharp scissors. You can also strip seed spices in the same way.
You can skip this step if you plan to remove your herbs after cooking with them; this is simply because the stems can be fairly unpalatable if eaten.
Herbs such as bay and parsley generally have very large, thick leaves so you’ll probably want to use a pair of scissors to snip these off. Other herbs such as parsley and thyme have very small leaves, so you can use your hand to gather the leaves in one quick swipe.
- You can purchase herb stripping gadgets either online or in stores which may well make this process a little easier.
By now your herbs and spices should be completely ready for the drying process! If you’re wondering where to begin when it comes to drying them along with exactly which of the many different drying methods you should choose then look no further.
In the next section, you’ll find a practical guide that details 9 very different drying methods; you’ll also find help and advice on which method is right for you and your chosen herbs and spices.
How to Dry Herbs and Spices – 6 Different Drying Herbs Methods

It’s very likely that you’re ready to begin drying your herbs and spices (unless you’re just flicking through this guide, in which case please feel free to keep reading!).
As you may already know, there are many different drying methods and unfortunately, this can make things appear slightly more confusing than necessary. When I first started drying herbs at home, I chose the air drying method with most herbs and spices as this was simply what felt the easiest and most familiar to me.
If you feel that one of the methods below is easier for you, then feel free to test out this method first or stick with it completely if that’s what you feel comfortable with.
This may all sound slightly daunting but actually, it all comes down to one thing; choosing a drying method that’s right for you and the moisture content of your chosen herbs.
If you get this right then you’ll have no issues and your dried herbs will be ready to use in no time! With seed spices, there’s no need to take into account the moisture content, which makes life even easier.
Below you’ll find a list of high-moisture and low moisture content herbs which will help you if you’re not quite sure which bracket your chosen herbs fall into.
High-Moisture Herbs
- Basil
- Oregano
- Parsley
- Mint
- Sage
- Bay Leaf
- Lovage
- Lemon Balm
- Lemon Verbena
- Mint
- Tarragon
Low-Moisture Herbs
- Rosemary
- Thyme
- Dill
- Savoury
- Sage
- Parsley
Now you’ve taken a look at the moisture content of many popular herbs, you’ll probably want to delve into learning how to dry them.
Below you’ll find step-by-step guides that detail 6 different herb drying methods along with a guide to which drying methods are best, depending on which herbs and spices you intend to dry.
1 – The Air Drying Method

The air drying method is one of the most popular ways of drying herbs at home; it is also a very successful method if you’re new to drying herbs as well as it’s fairly inexpensive and requires little time and effort.
Suitable for: Rosemary, Thyme, Dill, Sage, Parsley, Oregano, Bay leaves, Marjoram, Coriander and Black Pepper.
|
Step 1 |
Begin by harvesting your chosen herbs or spices correctly by following the steps that mentioned above. Ensure the herbs are completely dry (you can use a paper towel to pat herbs dry after washing) before completing the next step. |
|
Step 2 |
Gather a small bunch of your chosen herbs or spices and ensure that the amount you gather is no bigger than your palm; this should equate to 12-15 stems or seeds per bunch/handful. Create as many bunches or handfuls as necessary (depending on the amount of herbs you’ve harvested) and set each to one side. |
|
Step 3 |
Next, use either an elastic band or a length of string to tie the stems of each bunch of herbs together. Ensure that the bunches are fairly tightly bound together as you don’t want any stems falling loose whilst they’re drying. If you are drying seed spices, you can either leave the stems on or place upside down using this method (see tip 2 and cover with a paper bag for best results) or place the individual seeds in a paper bag. |
|
Step 4 |
Finally, leave your herbs or spices to dry upside down, attached to a piece of string, rope or even a coat hanger, in a dark, fairly warm area (between 80-90F is ideal) for 1 -3 weeks. If you are drying your herbs in a room that’s cooler than 80F, they will take up to 3 weeks to dry thoroughly. If you are drying them in a room that is 80F or over then expect them to be completely dried after 1-2 weeks. Generally, the higher the temperature, the quicker your herbs and spices will dry out. |
- Be sure to allow plenty of air to circulate in the room throughout the drying process; this will prevent them from spoiling or sweating in high temperatures.
- Tie a brown paper bag around each bunch of herbs in order to prevent dust or pests resting on your herbs; be sure to pierce some air holes in the bag to allow good circulation.
2 – The Tray Drying Method

The tray drying method is very similar to air drying except for the fact that it requires less space. If you have a small kitchen or are lacking the space to hang bunches of herbs upside down for an extended period of time then this method is a great alternative.
Suitable for: Short stemmed herbs and spices or those with individual leaves such as Bay, lavender, Coriander and Peppercorn.
|
Step 1 |
As with every drying method, follow the above steps to harvest your herbs and ensure they are completely dry (you can use a paper towel to pat herbs dry after washing) before completing the next step. |
|
Step 2 |
Gather your herbs and separate into bunches or handfuls of around 8 stems or 25 seeds each. |
|
Step 3 |
Ensure that you have at least 3 baking trays or other stackable trays to hand. Place each small bunch of herbs or seeds on the trays and ensure they are evenly spaced, with a gap of at least 2 inches between each bunch or a small gap between each seed. |
|
Step 4 |
Stack the trays on top of each other or place side by side and ensure there is at least a 10cm gap above the trays to allow for air to circulate. Leave to dry in a dark, warm place as before (70F/21C-80F/26C). Allow 3+ weeks in a colder environment or 1+ weeks in warmer temperatures. |
3 – The Oven Drying Method

The oven drying method is another very popular form of drying herbs and spices as it’s very quick and reliable, especially if you’re new to drying herbs and spices. This is likely because it’s very simple and as we all have ovens, it’s completely inexpensive and very handy too.
Suitable for: High-moisture herbs such as Basil,Sage, Oregano, Parsley, Mint, Lemon balm and Tarragon. This method is also suitable for all seed spices.
|
Step 1 |
Begin by separating your chosen herbs into bunches of 5-6 stems (a very small handful of herbs is also fine). Alternatively, as with all other drying methods, gather a small handful of around 25 spice seeds. |
|
Step 2 |
Lay each bunch of herbs on a large baking tray and separate so that they are evenly spaced; try to avoid piling the herbs on top of each other as this will disrupt the drying process. Repeat this process with seed spices, ensuring that the seeds don’t overlap too much. |
|
Step 3 |
Set your oven to the lowest temperature possible (under 100C/210F) and bake your herbs or spices in the oven for 1 hour. After 1 hour, open the oven door and allow the herbs to cook for a further 2-3 hours. The actual drying time will depend on the temperature of your oven and the type of herbs you are drying. |
|
Step 4 |
After this, leave your herbs or spices to cool completely before storing. |
4 – The Microwave Drying Method

The microwave drying method is a very speedy, simple drying method and essentially, it’s a much quicker version of the oven drying method.
Suitable for: High-moisture herbs such as Basil,Sage, Oregano, Parsley, Mint, lemon balm and Tarragon. Not Advisable for seed spices.
|
Step 1 |
Separate your herbs on a small plate or paper towel and ensure they are evenly spaced. |
|
Step 2 |
Place the herbs in a microwave and cook on high for up to 3 minutes. Be sure to check for signs that your herbs have dried and if you’re not sure, cook them again on high power for another 20 – 60 seconds. Allow to cool completely before storing. |
5 – The Dehydrating Drying Method

This method is particularly quick and fairly simple although it does require a food dehydrator, which means that it’s slightly more expensive than other drying methods. However, if you plan to dry herbs on a regular basis, this method may well be perfect for you.
Suitable for: Any low moisture and high-moisture herbs such as basil, thyme, lemon balm, chives etc.
|
Step 1 |
Harvest your chosen herbs or spices as described above. |
|
Step 2 |
Begin by spreading your chosen herbs or spices over your dehydrator tray. Ensure they are evenly spread out and avoid placing too many herbs on one rack as this will disrupt the drying process. If you need to, you can always dry another batch separately if you run out of space. |
5 – The Freeze Drying Method

The freeze drying method is particularly good if you are struggling to dry high-moisture herbs in a warm and sticky environment as they can often go mouldy before they dry completely. The freeze drying method eliminates the chance of mould growing completely as the herbs go straight in the freezer.
Suitable for: High-moisture herbs, including basil, chives, mint, lemon balm and tarragon. Not suitable for spices as this method reduces the flavour severely.
|
Step 1 |
Harvest and wash your chosen herbs as described above. Ensure your herbs are completely clean and dry before continuing to the next step. |
|
Step 2 |
If necessary chop your herbs finely so that you can fit around a teaspoon of your chosen herbs in an ice cube tray. Fill each ice cube holder with herbs and then top with water. Place carefully in a freezer for 24 hours. |
|
Step 3 |
Once your herbs are frozen into individual herb ice cubes, transfer a handful (around 5) ice cubes into separate plastic bags or airtight containers. |
|
Step 4 |
Store for up to 6 months and ensure that you defrost the herbs thoroughly before using. |
How to Store Dried Herbs and Spices and Keep them Fresh
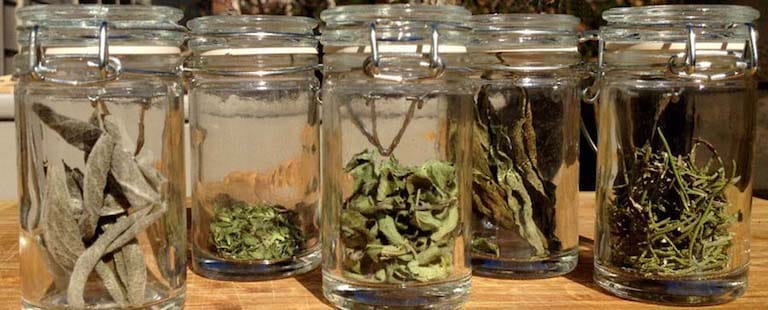
It’s fairly easy to tell when your herbs and spices are completely dried and preserved. Over the course of the drying process, you will notice that they become increasingly shrivelled and dry in appearance.
Seeds will turn slightly shrivelled and will become noticeably smaller than before. They will also take on a dull colour. Sometimes, even if you’ve followed the drying time guidelines, it can be difficult to tell if your herbs and spices are dried completely, especially if you’re drying for the first time.
To start with, I found that I was far too eager to pull my herbs from the drying process before they were ready. This resulted in semi-dried herbs and spices that perished within days or weeks.
To prevent this be sure to check that your herbs and spices are shrivelled and dry in appearance. They should also crumble or break when handled and the stems should break when touched.
As long as you have followed the drying guidelines and these signs are apparent throughout the whole batch of herbs, the drying process is most likely complete.
When your herbs and spices are completely dry, it can be difficult to decide how to store them correctly in order to maintain as long a shelf-life as possible.
Ideally, you should separate any large leaves and stems and package your herbs in an airtight container, jar or anything with a tight-fitting lid.
Usually, glass or plastic containers work well but if you are in a pinch, a heavy duty Ziploc bag will do for a few days. Store your home-dried herbs and spices in a dark, cool place away from sunlight and strong odours; this will keep them at their best.
Drying Herbs at Home – Common Problems and FAQs
1 – How long can I keep home-dried herbs and spices for?
Ideally, you should aim to use home-dried herbs within two years although herbs are often at their freshest and most fragrant within the first year.
If you store your dried herbs for longer than a year then a faint aroma and faded colour can indicate that your herbs are past their best.
2 – How do I deal with/prevent mould and mildew?
Herbs such as basil and tarragon have a high moisture content which means that they can often spoil and mould fairly swiftly.
Usually, you will find that your herbs become moldy when left at room temperature to air dry. This can be prevented by only air drying low-moisture content herbs such as rosemary and thyme and drying the higher moisture content herbs by using oven or freeze drying methods.
3 – Why do my herbs and spices have a strange flavour/ are flavourless?
This issue is generally due to incorrect harvesting as harvesting herbs either too early or too late can produce dried herbs that are either flavourless or strange in taste.
If you cut your herbs just before the buds appeared then you’ll have harvested them too early; this is because the naturally occurring oils would not yet be at their most pungent.
In contrast, if you waited to cut your herbs after they had flowered, you’ll have waited too long as the flavour diminished after herbs have flowered.
4 – Why do my herbs and spices spoil so quickly after being dried?
The answer to this question isn’t completely straightforward as there could be a number of reasons as to why your herbs have spoiled.
The first, most common reason is probably that you’ve pulled your herbs and spices from the drying process before they were completely dried. To prevent this again, check for signs your herbs and spices are completely dried.
Another reason for this issue could be that you’ve unintentionally used the wrong drying process for the type of herb or spice you’re drying. For instance, spice seeds aren’t suitable for freezer drying and it can be difficult to dry high-moisture herbs by air drying.
Sometimes though, herbs can spoil even if, for instance, you’ve air dried them as they have a low-moisture content.
In this case, check that you are following the drying guidelines correctly (depending on which drying method you choose) and ensure your herbs aren’t drying at an excessively high temperature.
Related: Arugula Substitutes
Conclusion
In conclusion, you will hopefully have found that this guide is an extremely helpful guide to drying herbs, even if you have no previous experience of drying herbs at all.
By now, you should have all the tools you need in order to dry many different types of herbs using many different methods and this means you’ll always have a large supply of herbs in your cupboard.
What’s even better is that you’ll likely have already saved yourself some money and you’ll have realised how expensive store bough herbs are compared to home-dried herbs. Just think of how much time and money you’ll save in the future if you continue to dry your own herbs!
As with many other things, drying herbs at home is a real art and if you practice it regularly enough, you’ll soon become an expert herb-dryer with the ability to harvest, dry and store herbs in no time.
In time, you will likely also feel comfortable enough to combine some herbs such as rosemary and thyme for instance in order to recreate the herb and spice mixes so often found in supermarkets.
Overall, you will hopefully have found that drying herbs at home is really enjoyable and certainly not as time consuming as many people think.
